When you start the program a splash screen appears with two options, you can
either start documenting components or wiring components. Documenting components
is not a topic for this tutorial, so we'll skip that for now. However, you'll
need to PacoDoc (our documenting tool) when you want to introduce new
components, composition patterns or composition adapters.
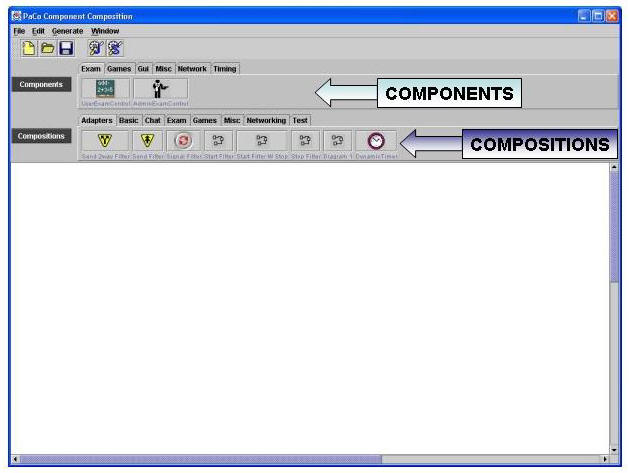
Click on wire components and the PacoWire tool will appear. It should
look like the following screenshot. If the icons are not loaded you'll need to
re-run the setup (see installation guide).

Below the application menu and toolbar, there are two toolbars organized into
different categories. The top toolbar represents the set of components the tool
knows about. The bottom toolbar represents the set of composition patterns and
composition adapters. Composition adapters are located in the adapters category,
the other categories contain normal composition patterns. The big white space is
the editing canvas, where the actual visual component building occurs.
To place a component on the canvas, you have to click on the component in the
components toolbar. Then point to a desired location in the editing canvas and
press the left mouse button. Notice that when you have selected a component in
the components toolbar the cursor changes in a cross when you hover over the
canvas. Now, place the JButton component of the GUI category onto
the canvas. If you accidently added wrong components, you can delete them by
pressing on the right mouse button on that component in the canvas. If you
placed the JButton on the canvas correctly you'll see a rectangle representing
that component on the canvas. Double-clicking on a component in the canvas
shows their documentation.
A composition pattern is placed on the canvas in the same way as a component.
Place the ToggleControl composition pattern of the Misc category
on the canvas. You'll see two rectangles connected with a central oval. This is
the representation of a composition pattern. The two squares represent the roles
of this composition pattern. Also, double-clicking on a composition pattern
shows the documentation.
Getting Started With PacoSuite >>
|
2003-02-19 15:01:44 - Wim Vanderperren
Latest build of the PacoSuite tool-suite can be found in the download section.
2003-02-19 15:01:19 - Wim Vanderperren
PacoSuite Website online.
|

